Creating Custom Bundles for On-Demand Resources
For the new in-app purchase flow, with on-demand resouorces, I needed to organize Reiterate’s products into separate bundles.

As I wrote previously, Apple is discontinuing their data service for new in-app products, recommending that developers move to on-demand resources. There’s quite a few tutorials on how to do this, but they’re all rather simplistic and seem to be based off of the same example that Apple gives in their docs, where your app is a game and you put the various levels into separate on-demand resources. That works fine if all you have a a dozen levels, and they’re all named differently, but what if you have a hundred products and you need more structure than that?
(Reiterate doesn’t have a hundred products, but we need to think of the future, right? I prefer to design things that are built to last.)
If your resource is a single file, it’s easy to tag that file with a resource tag and load it up. But for Reiterate, I wanted each Audio Pack to be its own resource. An Audio Pack consists of many separate audio files, along with a metadata file. The metadata file has the same consistent name across Audio Packs.
When you load an on-demand resource, by default that resource is loaded into your main bundle. (Since Reiterate is an iOS app, everything I discuss here is in that context, as opposed to MacOS. MacOS has bundles too, and they work much the same way, but I believe some of the details might be different). Bundles have a flat namespace. When you load a resource from a bundle, the API call looks like
let myResource = bundle.url(forResource: name, withExtension: ".jpg")There’s no notion of hierarchy. So What would happen if you loaded two resources that had a file with the same name? The documentation isn’t clear on that.
The documentation also isn’t very clear on the structure of bundles themselves. You’re not supposed to look too closely at the bundle internals. Just put things in there, and take them out again. I think that the reason for this is that bundles don’t really have a well- defined structure. There are certain types of bundles, like application bundles, that do have a well-defined structure, but a bundle can have literally any structure at all.
On the Mac, any directory that has a .bundle extension is a bundle:
% mkdir mybundle.bundleBam! You just made a bundle. If you look at it in the Finder, you can right-click it and Show Package Contents like any other bundle
(although this bundle is empty, obviously).
So this was the approach I took for Reiterate. I would create a separate bundle for each Audio Pack. That would give me a namespace for each product, so I could keep a consistent naming scheme within each product.
As an aside, it is possible to load a resource into a different bundle, if you pass that bundle into the call like so:
let resourceRequest = NSBundleResourceRequest(tags: myTags, bundle: myBundle)But the problem with that is that you need to have the bundle to load the resource into. I tried programatically creating bundles on the fly, and for whatever reason I couldn’t get that to work. XCode just likes having all its bundles predefined.
So here is the approach. We will create a bundle for each in-app purchase product, then tag each bundle as a whole with an on-demand resource tag. That way we can have a clean, segregated namespace for our products, without having to manage bundles in our swift code.
Step 1: Make a bundle
As I mentioned before, if we’re making our own custom bundle then it can have any structure we want. I made a subdirectory in my XCode project to hold all my product bundles, and then created bundle directories there like so:
$ mkdir test-bundle.bundle
$ cd test-bundle.bundle
$ cat > audio-metadata.json
{
  'title': 'This is a clip title'
  'filename': 'example.wav'
  'timing': [0.5, 1.2]
}
^D
$ cp /audio/files/example.wav .
Of course your bundle will be structured differently depending on your needs.
Step 2: Copy the bundle into the project
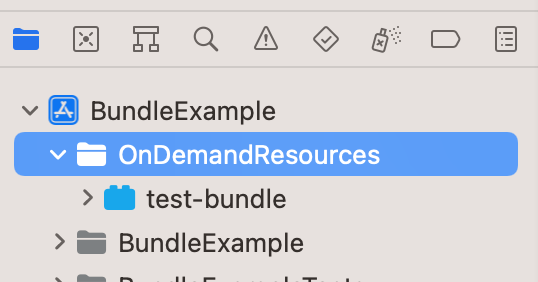
You add the bundle like any other file, either by dragging it (the directory, not the individual files) to your XCode project window, or by selecting “Add Files…” from the file inspector. It should show up as a little lego block, and all the sub-files inside the directory will be hidden under the disclosure chevron.
Step 3: Add the on-demand resource tag
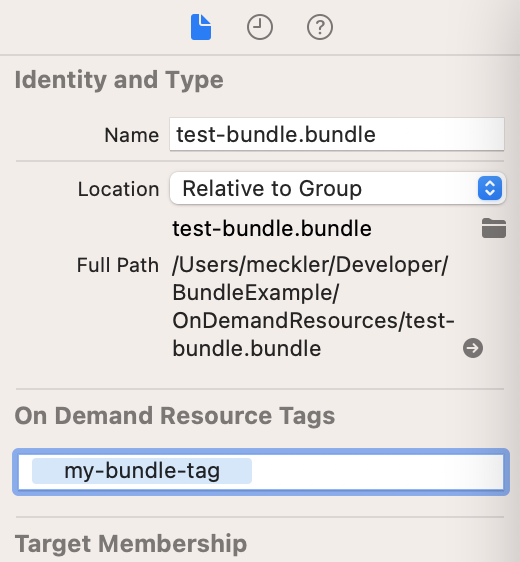
Select the bundle, then open the file inspector. There’s a place to add On Demand Resource Tags, and this is where you tell XCode that this bundle should be held back as an on-demand resource. When you upload the app to the App Store, the bundle gets signed separately, and when then app is downloaded by a user, they don’t get the bundle until your code asks for it.
Step 4: Load the on-demand resource
It’s helpful to have some sort of convention to derive the name of your resource bundle, but that will of course depend on your app. For this example I’ll just assume I’ve been given the name.
For my app, each resource corresponds to an individual Audio Pack that’s for sale. So I’m representing that with its own struct.
struct DownloadedAudioPack {
    let productID: String
    let request: NSBundleResourceRequest

    func resourcePath(for filename: String) -> URL {
        return request.bundle.bundleURL.appendingPathComponent(filename)
    }
}
All I need is the ProductIdentifier from the App Store, and the NSBundleResourceRequest that actually gets the resource. I have a
utility function which returns a URL to a file inside the retrieved resource. It’s important to note here that each resource is a bundle,
which is located inside my main bundle. Even though the bundle gets loaded into my main bundle, it’s not there when the app is first loaded.
Downloading an Audio Pack is very simple.
func downloadAudioPack(for productID: String) async throws -> DownloadedAudioPack {
    let request = NSBundleResourceRequest(tags: Set([getResourceTag(for: productID)]))
    try await request.beginAccessingResources()
    return DownloadedAudioPack(productID: productID, request: request)
}
getResourceTag can be whatever method you like. It just has to map the productID to the resource tag convention you use when you tag the
bundle in your project. I have read though that iOS doesn’t like periods in tag names, so you might want to avoid simply using
the productID as the bundle tag.
Now we can use the on-demand resource like so:
let audioPack = await downloadAudioPack(for: myProduct)
let audioFile = audioPack.resourcePath(for: knownFileName)
With this approach, I can have structured bundle resources which all conform to a uniform convention. I can add new products, and new bundles, whenever I want, and never have to worry about namespace collisions.